CAGD 470 - Vampiric Checkmate - Carl Moreno [3D Artist]
[Sprint 6]:
- Hello! For the sixth sprint of Vampiric Checkmate, my focus was to make sure each completed model had a prefab made so that the programmer could use them to place in the generated levels. I also made sure to complete any texture work I had left for the zone 3 models so that is it ready to go for Unity placement. I was also able to get to work with a bit of post-processing and lighting for the game. Gathering playtesters for the game was pretty fun as well as hearing about the reactions to the game and where to improve from.
 |
| Character and object lighting! |
- For model importing to Unity, the challenge that I faced was making sure that every single model was sized properly so that it fit within the tiles. So, that means setting the size to 0.001 for each prefab. It did take a while but it was definitely worth it seeing the levels come to life for the alpha build. Another challenge that I faced was making sure that each level had separate walls for certain-sized rooms. Such as a new hallway piece and 8 tile long wall so the levels could be sized up to a 16x16 grid. I also made sure that each zone had proper organization so that the programmer could find everything easily. For the character models, I also created a new center point so that the characters can walk on the center of a tile perfectly. That way, the character isn't walking around between two tiles in the game scene.
 |
| Unity Importing - The remaining modular pieces and setting them as separate prefabs. |
- Next, I was able to work with the lighting for the scene such as post-processing bloom, low-resolution effects, and needed point lights for items/characters. For the characters, I made sure to place a light over the character and a glowing light where its small platform is so that players can distinguish between their player and an enemy. The vampire character is signified by a blue light and enemies have red glow lights. I also made sure to place point lights for toches, sigil keys, and miscellaneous table items for the wizard. The sigil keys are required to have lights on them so that the player can find them easily roaming around the levels. Characters such as the bat buddy and the wizard are also color-coded to be white for the bat and purple for the wizard.
 |
| PS1 style Low-resolution look in-game! -with added Fog |
- For the post-processing, I was able to work on some low-resolution effects which was the vision from the Lead at the start of this project. This game has the look of PlayStation One graphics so my goal was to make it look like it was from the era and for the low-poly models that I modeled to pop more. I enjoyed working with the render texture for this because I have never worked on something that looks low-resolution, but I was able to successfully add it into the game for the next beta build. I hope that players enjoy the look of it and can hopefully see the objects well enough. I think for the final build, I will bring up the resolution just a tad bit, but it will all depend on player feedback.
 |
| Zone 3 Props Textured! |
- Overall, this sprint was mostly for polishing and making sure that all the completed models remaining were placed in Unity so that the levels could be built up by the programmers. It went exactly how I wanted it to go and I am proud of my work this sprint. In addition, I was able to conduct some playtesting for the alpha build for seven players. They all really enjoyed the concept of the game and had fun with the mechanics. I am excited to do some bug hunting this coming sprint so that the game can officially be polished and ready to ship. It was an honor working as the modeler and texture artist for Vampiric Checkmate; be sure to check it out on Itch.io!
---------------------------------------------------------------
[Sprint 5]:
- Hello! For the fifth sprint of Vapiric Checkmate, my focus was to make sure the levels had enough models to populate the scene so that the player does not walk through empty levels. The goal for this sprint was to make sure that we have a working build so that players could judge how the game feels and looks. I was able to complete models such as items for the safe room, finish the inner tile models, which include inner walls, firepits, lanterns, ditches, sword stands, and more.
 |
| The Wizard vendors' ultimate book! |
- The main priority models for the sprint that I've completed were the inner tiles designed for each of the zones. My favorite out of the bunch was the inner tiles for zone 3. This zone included things such as a fire pit, a lantern stand, and a sword stand. I did not receive any issues revolving the models, but Maya did indeed crash on me a few times for some reason, so I had to remake a couple of things. But after I remade a few of my models that got corrupted, I was satisfied with how they came out for the final version. I still have yet to texture them, which I will have completed by the next sprint, so that they can make it to our next build. The models will be placed and generated by the programmer, Heath, so that the levels will be populated with obstacle tiles.
 |
| Zone 3 Inner Tile Props! |
 |
| Zone 3 - All |
- What did make it into our build were the inner tile pieces for zones 1 and 2, and I am proud of how they turned out in-game. They are mainly used as an obstacle for the player so that they can maneuver around the map, kind of like a maze. Each zone has a different style of inner tiles, and some will share the same based on what level the player is on.
 |
| Zone 2 Inner Tile Group Pieces! |
- For the safe zone pieces, I was able to model things such as fruits, potions, a book, tables, and a cool plasma ball. I have also built up the scene together in Unity with all the old and new models to create the safe zone room. The safe zone room will be used as a space for the player to get a breather and purchase things from the wizard vendor. I think it is also a fun little hangout spot since there are things such as a bar counter and drinks available. I have also placed doors in the scene so that the player can exit the room easily and head back into the field so that they can continue progressing through the levels. Also to mention, the safe zone room is a smaller tile scene compared to the actual levels, so that the player can get from one side to the other more quickly and easily.
 |
| Plasma ball! |
 |
| Fruits! |
- Overall, this sprint was mainly prioritizing the last high-priority models needed for the game to feel more complete. I was able to successfully complete all the models for the game, and now it is time to bring everything together into Unity so that it is visible to the players. For the next sprint, I will be working on things such as the skybox for the scenes and conducting more playtests for the game so that we receive the proper feedback that we need. The next couple of sprints will be wrapping everything up and to help squash bugs so that we can successfully ship the game out to our liking. I am eager to see what the next sprint holds, and I will continue to push out more cards to assist in the completion of Vampiric Checkmate!
 |
| Chair & Table for the safe zone room! |
---------------------------------------------------------------
[Sprint 4]:
- Hello! For the fourth sprint of development of Vapiric Checkmate, my focus was to complete the last pieces of modular pieces so that the team can have them ready to place for the next playtest coming up. I made sure to place all of the newest update to date models with placed colliders so that way it it would be an easy plug and play. The models that I completed this sprint were the Bat Buddy, glass bottles, bar set pieces, sigil keys, wall trims for each zone, and a wooden vendor cart for the wizard.
 |
| Glass bottles for the bar! [Safe Room] |
- The sigil keys were the standout model for this sprint next to the Bat Buddy which I was proud of modeling. The challenging part was modeling the keys on a flat plane and trying to imitate it similar to the references I was given. I did have to remake a few keys a couple of times, but I was able to get it to a point where it looked pretty decent. I was also able to place emissive on the keys so that the player will be able to catch them easier in the darker areas of the rooms. The keys are going to be used to go onto the next level so making them visible is a must.
 |
| The Sigil Keys! |
- I was also able to create a Bat Buddy model this sprint which is going to be used as a guide to assist the player in difficult situations and learn the techniques. I really enjoyed modeling this character and I was able to successfully create the bat buddy model following the PlayStation 1 graphic standard that the lead has placed. I was able to download a fur material from the community asset store and I think that it suits the bat very well since they are furry creatures after all. For the wings I went with a more dirty plastic look since they are after all part chess piece, so making it seem like a toy was the way to go.
 |
| The Bat Buddy model! |
- For the next models, the main focus was to pump out items for the safe room for the player to roam around and catch a breath before they go back to the battlefield. I was able to create a bar set, glass bottles, and a wooden vendor cart where the player will be able to purchase some items. The standout piece from the safe room was the wooden vendor cart since I made it vibrant for the player to be able to distinguish what it is and lure them in. The bar set was also a standout piece that I modeled for the safe room with a very nice sleek marble texture that I placed on it.
 |
| The Wizard's wooden vendor cart! [Safe Room] |
 |
| The Bar Set! [Safe Room] |
- As far as the overall models being produced out, I am in a really good position and the team is feeling really proud of my work so far. The goal is to make sure all the mechanics are in place and then we will place all the models in to make it look fancy. We will definitely have models in place for the next sprint so that players will be able to distinguish what is what and give the proper feedback so that we can improve from. What I will be working on next will be the miscellaneous items to fill up the safe room and lighting pieces to light up each level. I want to make sure that the safe room feels welcome to the player with a filled scene rather than just a bar table and a vendor cart. I am looking forward to the next upcoming playtest to know what players think and what to improve on!
---------------------------------------------------------------
[Sprint 3]:
- For the third sprint of development of Vapiric Checkmate, my focus was to complete the walls, inner tiles, and inner tiles props for the first levels so that the team can get a feel of how the game will feel with its assets implemented. The wall pieces and inner tiles that I have completed are modular so that we are able to quickly plug and play the walls into the scene with no problems. The modular walls that I was able to complete were zones 1-3 and zone 1's inner tiles.
 |
| Up to date models placed into Unity! |
- For zone one's modular pieces, the theme of the level is like a concrete mixed with mossy floors. I made sure to texture the tile pieces with a dirty mossy look so that the building the player is roaming through seems kind of abandoned. Same with the concrete walls, I added hints of cracks and dirt around as well and some cracked glass for the windows. For the windows I made sure to add some roughness to them but have it so it is just shiny and not see through since the player does not need to see out of the map.
 |
| Modular Walls for Zone One! |
 |
| Tile pieces for zone one. (Specified to fit a certain tile size!) |
- I also was able to model the inner tile pieces and props for zone one which consisted of specified sized concrete walls, wooden crates, wooden barrels, broom, and a plastic bucket. The small props were extremely fun to model and texture and I am glad on how they turned out. Each piece within the tile piece set was specified to a certain size such as, 3x2, 4x4, 1x2, so that the their is variety within the level that the player can maneuver in. That way, it is not a plain checkboard.
 |
| Tile Piece Props! |
- For zone two's modular walls, the theming of the level is a wooden mixed with some brick area. The wooden textures of the modular walls made them stand out with the added ambient occlusion. For the corner piece, I made sure that it have a curve involved so that it can feel unique to the other levels instead of a sharp corner edge. The tile pieces for this level is a wooden plank type so that it can differentiate from the walls so that it is not all completely the same texture.
 |
| Zone Two - Wall, Corner Wall, Tile Piece (To fit 8x8) |
- Lastly for zone three's modular walls and tile, the theme of this level is a golden mixed with black and white theme so that is feels kind of like a mini throne room. The challenge with the textures of this was making sure the white did not seem like a lambert color. I made sure to set it like a white painted on concrete mixed with some rust generators to make it pop. The tiles for this zone give it more of that checker feel mixed with some gold in the center of the tile.
 |
| Zone Three - Wall, Corner, Wall, Tile Piece! |
- A few other things that I've worked on this sprint was model some of the sigil pieces that the player will have to be able to collect around the map to unlock doors to other levels. I am modeling it based off a flat plane of an image designed by the lead designer and tracing them out with the select tool which was a bit of a challenge making it look good. I made sure to make the plane a 60 by 60 so that I am able to get the best curves out of the design while still giving it that PlayStation 1 look. Lastly, I was able to gather of my up to date models and place them into Unity with textures placed and create them into prefabs. It is quickly coming along together and I am truly excited to start piecing the level together for the next playtest.
 |
| Sigil Models. (Used as keys to unlock other levels!) |
---------------------------------------------------------------
[Sprint 2]:
- For the second sprint of development, now named Vapiric Checkmate, I was tasked with creating the models and textures for the characters and new environmental items. I am enjoying my role as a 3D modeler and texture artist so far and am eager to work with the team on the next models. During the second sprint, we were able to find our footing for the team and we know just about what our scope should be based on our burndown chart. I was able to complete over 20 plus points this sprint and I am proud of myself, I plan to continue at the same pace moving forward. As far as the work completed, I have completed all the models and textures for the characters in the game. I was also able to complete a few environmental models such as a throne, double door, red carpet, and a pitfall trap.
 |
| Three enemy human characters textured with weapons! |
- For the four characters modeled and textured, I used the same vibe for the three enemy humans. They represented an angry mob, and I modeled three different tools for them to use as weapons. Also to mention again, the design the team agreed with was to go with a PlayStation 1-style type of graphics/models. I made sure the models followed the same vibe overall so that they did not seem out of place. My favorite tool that I enjoyed modeling was the axe, it came out exactly how I expected it, and proud of the result. The rake and baseball bat also came out extremely good and there were no issues that prompted up during the UV and texturing process. The fourth character who was not an enemy was a wizard vendor to help assist the player in purchasing skill sets. I extremely loved the way the textures came out for the wizard and I would definitely like to save this as a highlight for my portfolio. I had tons of fun modeling the wizard uniform and placing star alphas around to bring the wizard vibe to light. As well as adding emission light to the wizard's wand!
 |
| The Vendor! (Wizard Style) |
- The next models that I completed this Sprint Two were a pitfall trap, a throne chair, a double door, and a red carpet. I definitely enjoyed how all of them looked, but the standouts were the pitfall trap and the throne. I based it off of concept art and it came out perfectly as how the designer asked. The throne chair was a little complex at first, but I was able to make the right multi-cuts and make it look proportionate to size. Placing the ambient occlusion on the throne model was extremely fun to experiment with, and it really made the model shine more. For the pitfall model, the team is planning to have it open up so the player could fall into it and be eliminated if they end up being over the trap. It is a wish and want at this time, so I decided to make the model for the door and the support separate models so that it can be easier to use for animation purposes.
 |
| Throne Model! |
 |
Pitfall model!
|
- As sprint two came to a close, I started placing all the models into the Unity project so that the programmers and level designer could start to work with the models for the electronic prototype. What I am working on currently is modeling out the modular wall pieces for levels 1-9 so that the player can have a barrier and a maze-like playfield. I am extremely satisfied with the work that was completed for the second sprint and plan to keep up the pace so that the team can have a successful electronic prototype.
 |
| Unity models placement! |
 |
| Extra! Double door. |
---------------------------------------------------------------
[Sprint 1]:
- For the first sprint of development of After Dusk (title may change), I have been tasked with the role of the team's 3D modeler and texture artist. My experience with this role is no stranger to me, although it is a little different when it comes to working with a smaller team. I have previously worked on Perry's Pies as a 3D modeler and Texture Artist but with a larger group. It seems much calmer since we are able to share our thoughts more easily with everyone since there are only five members in total. This is great practice to simulate an indie game company which normally has a small team of people. I think I will enjoy it along the way and be able to have more small-group experience under my belt in the industry.
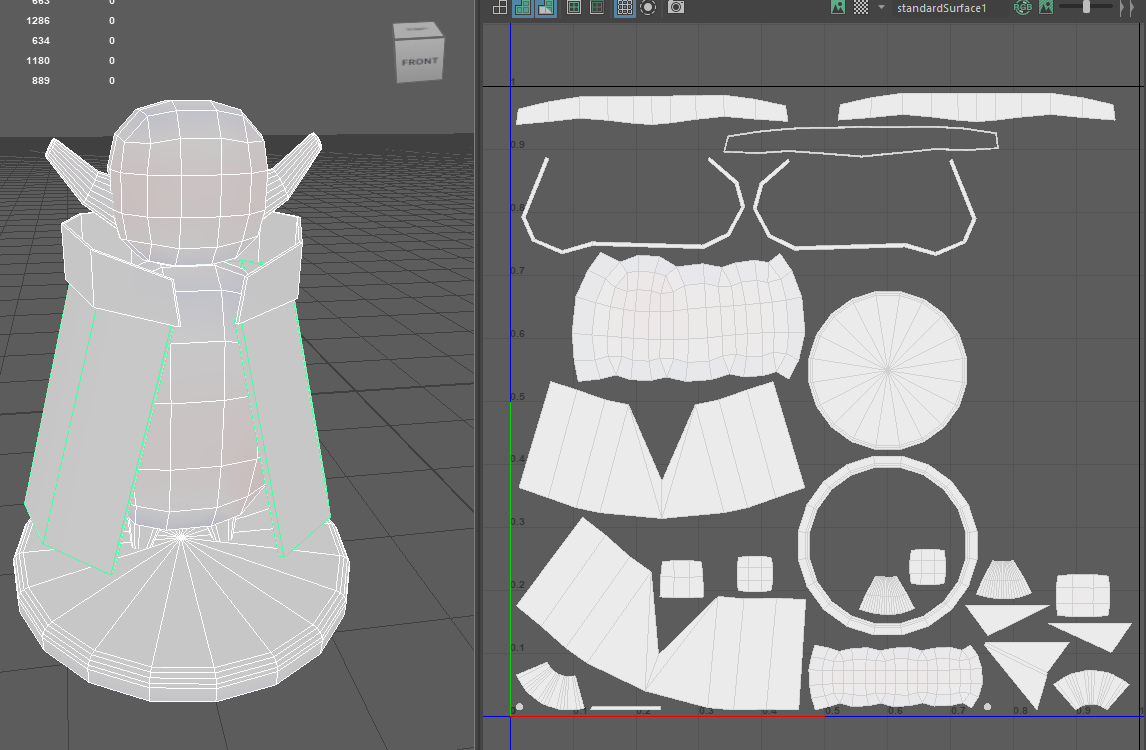 |
| The development of the main character! (PS1 Style!) |
- For the sprint kickoff, my priority was to have the main character modeled out so that the designers could use it for testing purposes as soon as possible. The character design that I was assigned was a PlayStation 1 style vampire character, this really interested me because I've never really modeled any characters before and I really enjoy the style of old Playstation characters because it gives a sense of nostalgia. The model came out pretty amazing to that old-school standard, with nothing too crazy in faces which should help with the performance of the game. I had a really fun time texturing this vampire character, I went with some dark colors for the overall look and went with red for the secondary color.
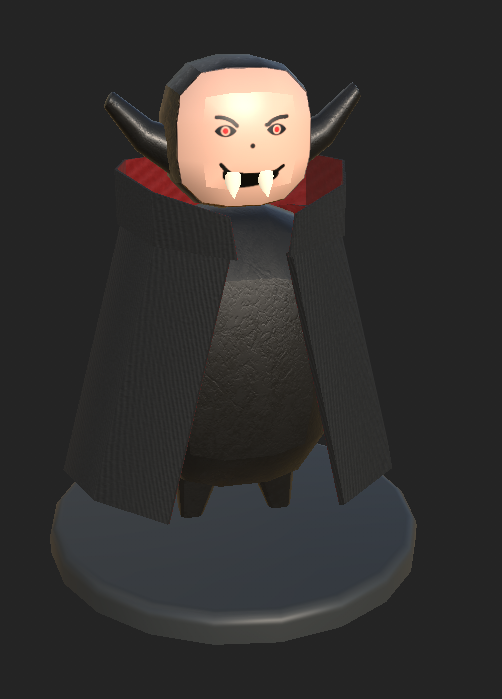 |
| The vampire main character's final look! |
- The next character I got to work on, was the main enemy character. It is supposed to imitate a farmer-looking character that is involved with angry mobs. I also enjoyed modeling this character, because I was able to give it some expression with its cowboy hat and farming tool. The tool that I chose to model was a pitchfork, I designed it so that it was textured to look dirty like if it was used before, and has some roughness to it. I was not able to complete the rest of the textures for the rest of the characters since the team was deciding on whether we should have more than one human enemy. I did have an idea in my head to have the characters have different colored clothing and perhaps a different tool to differ from each other. The UV'ing process was not extremely difficult since the character was following the low-poly Playstation style that the team was aiming for. Something that I added as an extra piece that the vampire did not have was arms.
 |
| Human 'Enemy' Character! |
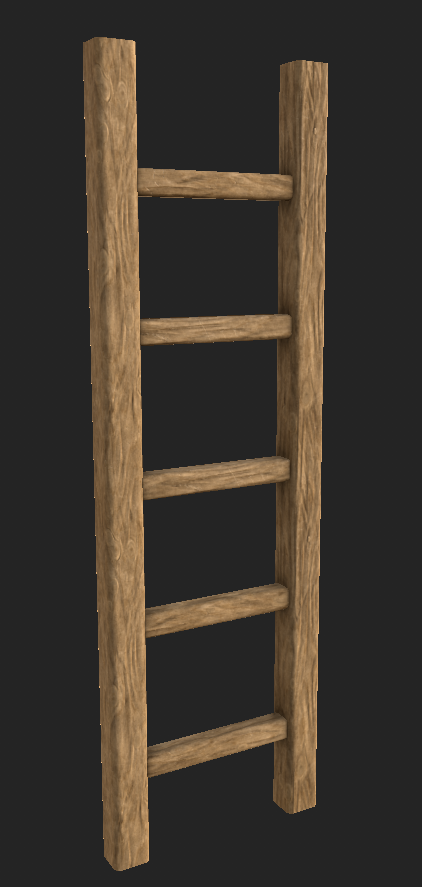
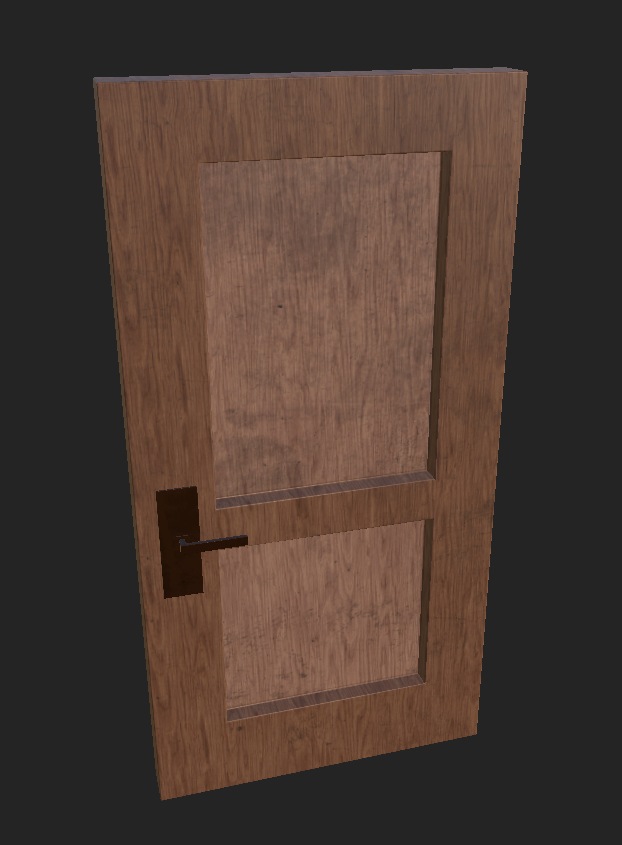
- The next few items that I modeled this first sprint were a wooden door, a concrete obstacle with a light, and a ladder. Out of the three I really enjoyed modeling the obstacle with a light because I placed many small details into the concrete piece of it. Such as dirt generators, a brick generator, and small cracks. I personally love texturing concrete pieces because there is so much detail that goes into it that we do not even realize it.
- What I am currently working on is completing the textures for the different variations of the human enemy character. I plan to give them different colored clothing, model a new second weapon (baseball bat), and have different skin tones. For sprint 2, the team has officially decided that we would like to have different human characters following the vampire so that it can become a little more strategic in-game. Plus, this game will follow a chess-style system, so more characters is the ideal option. I am excited to see what the future holds for the development of After Dusk!
--------------------------------------------------------------


No comments:
Post a Comment